
What Are Cronuts and Why Are They Worth Making at Home?
If you’ve ever stood in line outside a bakery at sunrise just to get your hands on a cronut, you already know: this hybrid of croissant and doughnut is nothing short of a pastry marvel. Combining the delicate, buttery layers of a croissant with the rich, golden crispness of a fried doughnut, cronuts are as decadent as they are delicious. Born in a New York City bakery and now a global sensation, cronuts typically sell out within minutes—so why not skip the line and make your own at home?
Making cronuts from scratch is a project, but it’s entirely doable with patience and planning. You’ll create a laminated dough—just like for croissants—chill it overnight, and then cut, fry, and sugar-dust your way to a batch of impossibly flaky, deeply satisfying cronuts. We’ll walk through the process in detail, with troubleshooting tips and techniques to ensure success, even if this is your first time working with laminated dough.
And yes, you can fill them with pastry cream and glaze them if you like, but even a plain sugar-crusted cronut is a bakery-worthy treat.
Ingredient Breakdown: Why Each Component Matters
Because cronuts are essentially croissants that are fried, every ingredient plays a crucial role in achieving the right texture and flavor:
Dough:
- All-purpose flour: A balanced flour that provides enough structure without making the dough tough.
- Instant yeast: Reliable and easy to incorporate directly into the flour.
- Granulated sugar: Adds mild sweetness and aids in browning.
- Salt: Essential for balancing the sweetness and bringing out flavor.
- Whole milk: Used to hydrate the dough and keep it rich and soft.
- Unsalted butter: A small amount in the dough adds tenderness.
Butter Block (Beurrage):
- European-style unsalted butter: Higher fat content (82%) and lower moisture than standard butter make it ideal for laminating. Brands like Plugrá, Kerrygold, or President work well.
Frying & Finishing:
- Neutral oil: Vegetable or canola oil with a high smoke point is best for frying.
- Granulated sugar: For coating the finished cronuts.
- Optional glazes or fillings: Vanilla glaze, chocolate ganache, fruit compote, or pastry cream can all be used for variation.
Tools and Equipment for Homemade Cronuts
While you don’t need a professional bakery setup, having the right tools will make your cronut journey smoother:
- Rolling pin: A long, heavy one is best for even pressure during laminating.
- Bench scraper: Essential for shaping and lifting sticky dough.
- Pastry brush: For brushing off excess flour between folds.
- Sharp doughnut cutter: A round cutter (3½ inches) plus a smaller one (1 inch) for the center.
- Deep-fry thermometer: Maintaining a steady oil temperature is crucial.
- Heavy-bottomed pot or Dutch oven: For deep frying.
- Wire rack & paper towels: For draining fried cronuts.
- Stand mixer (optional): Speeds up kneading but not strictly necessary.
Understanding the Process: Laminated Dough Meets Deep Frying
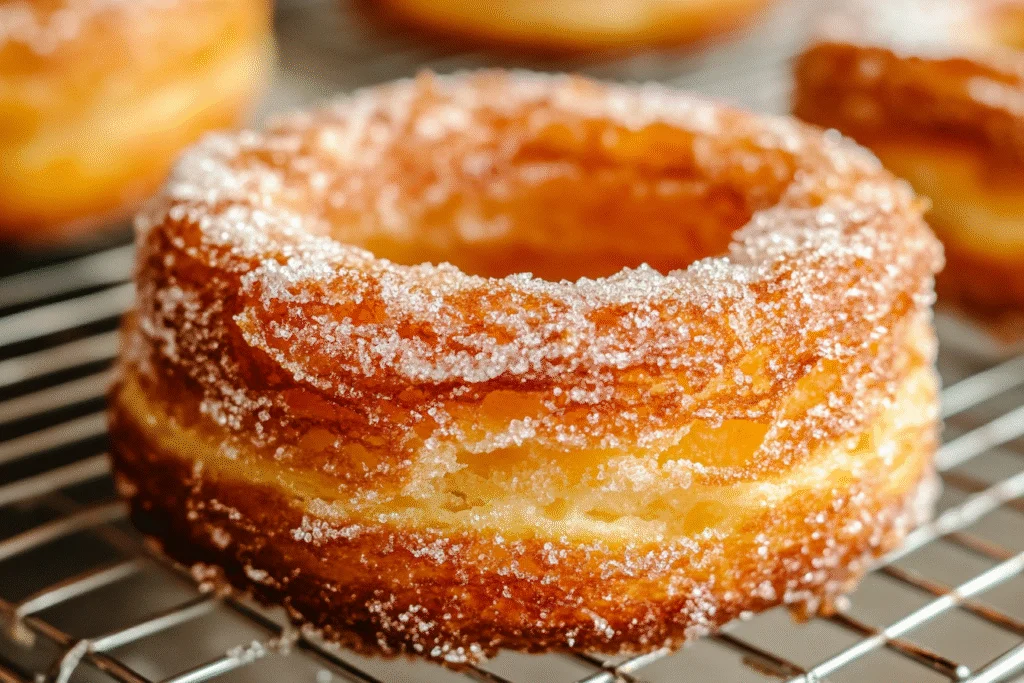
The technique behind cronuts starts with laminated dough, the same kind used for croissants or puff pastry. The layers are created by folding and rolling dough around a slab of butter multiple times—a process known as “turns.” This takes time, rest periods, and chill time, but the payoff is hundreds of delicate, buttery layers that puff up beautifully when fried.
Once the dough is laminated and chilled overnight, you’ll roll it out, cut into doughnut shapes, let them proof briefly, and then fry until golden and puffed. A sugar coating adds crunch and sweetness, and optional fillings or glazes take things over the top.
Troubleshooting Lamination and Dough Tips
- Butter breaking through the dough? Your butter may be too cold or your dough too warm. Always chill the dough between turns and work quickly.
- Dough resisting or shrinking while rolling? Let it rest, covered, for 10–15 minutes to relax the gluten.
- Butter melting during laminating? Chill your dough if it gets too soft. Pop it in the freezer for 10 minutes between folds if necessary.
- Uneven layers after frying? Make sure your butter is evenly distributed and that you’re applying even pressure during rolling.
Flavor Variations and Topping Ideas
Once you’ve mastered the classic sugar-coated cronut, the customization possibilities are endless:
- Vanilla Glaze: Mix powdered sugar, milk, and vanilla.
- Chocolate Glaze: Combine melted chocolate with cream.
- Cinnamon Sugar: Roll fried cronuts in a mix of sugar and cinnamon.
- Filled Cronuts: Inject with pastry cream, lemon curd, or jam.
- Seasonal Twists: Pumpkin spice, matcha glaze, or maple glaze with bacon bits.
Make-Ahead and Storage Tips
Cronuts are best eaten the day they’re fried—ideally within a few hours. However, many components can be prepared ahead:
- Dough: Can be made and laminated up to 2 days in advance. Wrap well and refrigerate.
- Freezing: Cut cronuts can be frozen before frying. Thaw in the fridge overnight and proof before frying.
- Glazes and fillings: Make up to 3 days ahead and store in airtight containers in the fridge.
Ingredients
For the Dough:
- 3½ cups (440g) all-purpose flour
- 2¼ teaspoons (1 packet) instant yeast
- ¼ cup (50g) granulated sugar
- 1¼ teaspoons salt
- 1¼ cups (300ml) whole milk, warm (110°F)
- 2 tablespoons unsalted butter, softened
For the Butter Block (Beurrage):
- 1 cup (225g) European-style unsalted butter, cold
For Frying and Finishing:
- Neutral oil (vegetable or canola), for deep frying
- ½ cup granulated sugar, for coating
- Optional: Glaze, powdered sugar, or pastry cream for filling
Instructions
Day 1: Make and Laminate the Dough
- Make the dough: In the bowl of a stand mixer (or by hand), combine flour, yeast, sugar, salt, warm milk, and softened butter. Mix until a shaggy dough forms. Knead for 6–8 minutes until smooth and elastic. Cover and chill for 1 hour.
- Prepare the butter block: Place the cold butter between two sheets of parchment and pound it into an even 6×6 inch square using a rolling pin. Chill until firm but pliable, about 15 minutes.
- Enclose the butter: Roll the dough into a 10×10 inch square on a lightly floured surface. Place the butter block in the center, turned like a diamond. Fold the corners of the dough over the butter, sealing the edges.
- First fold (turn 1): Roll the dough into a 20×10 inch rectangle. Brush off excess flour and fold in thirds like a letter. Cover and refrigerate for 30 minutes.
- Second and third folds (turns 2 & 3): Repeat the rolling and folding process two more times, chilling for 30 minutes between each fold. After the final fold, wrap tightly and refrigerate overnight.
Day 2: Cut, Proof, Fry, and Finish
- Roll out the dough: On a lightly floured surface, roll the chilled dough into a ½-inch thick sheet.
- Cut the cronuts: Use a round cutter (about 3½ inches) to cut out doughnut shapes, then a smaller cutter (1 inch) to cut out the centers. Place on parchment-lined trays, cover lightly, and let proof at room temperature for 45–60 minutes, until slightly puffy.
- Heat the oil: In a heavy pot, heat 2–3 inches of oil to 350°F (175°C). Use a thermometer to monitor the temperature.
- Fry the cronuts: Fry 2–3 at a time, 2–3 minutes per side, until golden brown and puffed. Drain on a wire rack over paper towels.
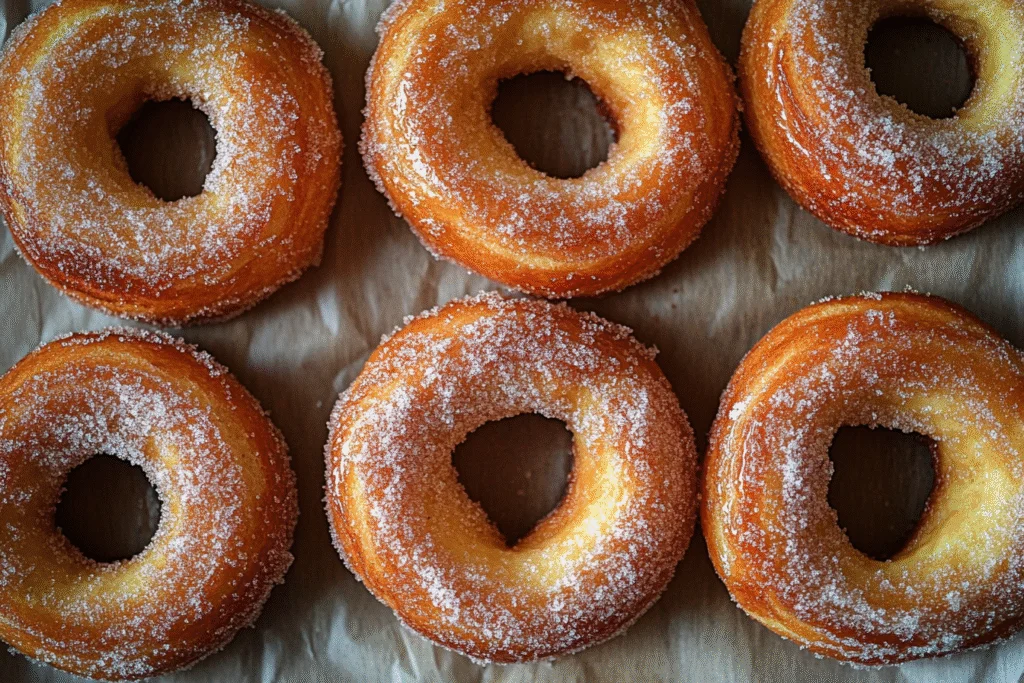
- Coat in sugar: While still warm, roll the cronuts in granulated sugar.
- Optional glaze or filling: Let cool completely before glazing or filling with pastry cream or jam.
FAQs and Troubleshooting
Q: My butter keeps leaking—what should I do?
Chill your dough longer between turns. Don’t skip rest periods. If butter is peeking through, patch with a dusting of flour and fold gently.
Q: Can I use store-bought puff pastry?
Not for authentic cronuts—puff pastry doesn’t have yeast and won’t rise the same way. The texture will be off.
Q: Do I need to fry them, or can I bake instead?
You can bake them at 375°F for 20–25 minutes, but the texture will be more like a croissant than a true cronut.
Q: Can I use active dry yeast instead of instant?
Yes, dissolve it in the warm milk first and let it sit for 5–10 minutes until foamy before mixing.
Storage and Serving Tips
- Best served: Within 4–6 hours of frying.
- Short-term storage: Keep in an airtight container at room temp for 1 day. Reheat briefly in a 300°F oven to refresh.
- Do not refrigerate: It dries them out.
- Freezing: Freeze the raw, cut doughnuts and fry fresh for best results.
There’s nothing quite like a homemade cronut: shatteringly crisp on the outside, soft and airy on the inside, and utterly luxurious from first bite to last. Yes, it’s a baking project—but it’s also a showstopper, a weekend reward, and the ultimate pastry for those who love baking with a touch of ambition.