
Beef bone broth has long been celebrated for its rich flavor, comforting warmth, and impressive nutritional benefits. Unlike a basic beef stock, bone broth is simmered for an extended period—often 12 hours or more—to extract collagen, minerals, and deep, complex flavors from the bones, marrow, and connective tissue. The result is a golden, gelatinous broth that can be sipped on its own, used as a soup base, or incorporated into countless recipes to add depth and body.
Making homemade beef bone broth is simpler than it seems—it just takes time and patience. This comprehensive recipe will walk you through everything you need to know, from choosing the best bones and aromatics to simmering techniques, troubleshooting, storage, and flavor-enhancing variations.
Why Bone Broth Can Be Tricky: Common Mistakes and How to Avoid Them
Beef bone broth is not difficult to make, but several missteps can lead to a cloudy, flat-tasting, or greasy broth:
- Skipping the roasting step: Unroasted bones can lead to a pale, bland broth.
- Boiling instead of simmering: A rolling boil can emulsify fat into the broth, making it cloudy.
- Not skimming the foam: The initial scum that rises contains impurities and should be removed.
- Using the wrong bones: Too much marrow or not enough collagen-rich joints can throw off the texture.
With proper preparation and a long, gentle simmer, you can create a clear, flavorful, nutrient-rich bone broth every time.
Selecting the Best Bones for Bone Broth
The bones you use will determine the broth’s richness, flavor, and gelatin content.
Ideal Bones for Beef Bone Broth:
- Marrow Bones: For rich flavor and nutrients.
- Knee Joints, Knuckles, and Feet: High in collagen, which gives the broth its signature gelatinous texture.
- Meaty Bones (like oxtail or short ribs): Add deep beef flavor.
- Neck Bones: Affordable and collagen-rich.
Pro Tip: A mix of marrow bones and joint bones will produce the best balance of flavor and body.
Additional Ingredients to Build Flavor
- Onion: Halved, skin-on adds a deep color.
- Garlic: Whole cloves or halved bulbs.
- Carrots and Celery: Classic aromatics.
- Apple Cider Vinegar: Helps extract minerals from the bones.
- Bay Leaves, Peppercorns, Fresh Herbs: Add layers of flavor.
- Salt: Often added later to control seasoning.
Optional: You can add ginger, star anise, or other spices if you’re leaning toward an Asian-style broth.
Essential Equipment for Bone Broth Success
- Large stockpot (at least 8 quarts) or slow cooker for long simmering.
- Fine mesh strainer or cheesecloth for straining.
- Roasting pan for pre-roasting the bones.
- Ladle and heatproof storage containers.
If you plan to make bone broth regularly, a pressure cooker (like an Instant Pot) can significantly reduce cooking time.
Smart Preparation and Cooking Strategy
General Timeline:
- Roasting Bones: 30-40 minutes
- Simmering: 12-24 hours (minimum 8 hours for a lighter broth)
- Cooling and Straining: 30 minutes
Key Prep Tips:
- Roast the bones first. This develops flavor and color.
- Skim foam diligently in the first 30 minutes of simmering for a clearer broth.
- Simmer gently. A rolling boil can cloud the broth.
Flavor Boosters and Customizations
- Umami Additions: A splash of soy sauce or fish sauce deepens the flavor.
- Herbal Notes: Fresh thyme, rosemary, or parsley stems.
- Aromatics: Ginger and lemongrass for an Asian twist.
- Spices: Cinnamon, cloves, and star anise for pho-style bone broth.
Common Mistakes and How to Fix Them
- Cloudy Broth: Boiling instead of simmering. Always maintain a gentle bubble.
- Greasy Broth: Skim fat during simmering and chill the broth to easily remove solidified fat.
- Bland Broth: Not enough bones, too much water, or not enough simmering time.
- Broth Doesn’t Gel: May need more collagen-rich bones or longer simmering.
Storage and Freezing Tips
- Refrigerator: Store in jars or airtight containers for up to 5 days.
- Freezer: Portion into containers or ice cube trays and freeze for up to 6 months.
- Reheating: Warm gently on the stovetop. Bring to a simmer before consuming.
If storing long-term, leave space in the jars for expansion.
Beef Bone Broth Recipe
Ingredients
For the Broth:
- 4–5 pounds mixed beef bones (marrow, knuckle, meaty bones)
- 2 tablespoons olive oil
- 2 large onions, halved (skin on)
- 3 carrots, roughly chopped
- 3 celery stalks, roughly chopped
- 6 cloves garlic, smashed
- 2 tablespoons apple cider vinegar
- 3 bay leaves
- 10 peppercorns
- Water to cover (about 6-8 quarts)
- Salt, to taste (optional—can season later)
Step-by-Step Instructions
Step 1: Roast the Bones
- Preheat oven to 425°F (220°C).
- Arrange bones on a baking sheet and drizzle with olive oil.
- Roast for 30-40 minutes, turning once, until well-browned.
Step 2: Prepare the Broth Base
- Transfer roasted bones to a large stockpot or slow cooker.
- Add onions, carrots, celery, garlic, bay leaves, peppercorns, and apple cider vinegar.
- Cover with cold water by about 2 inches.
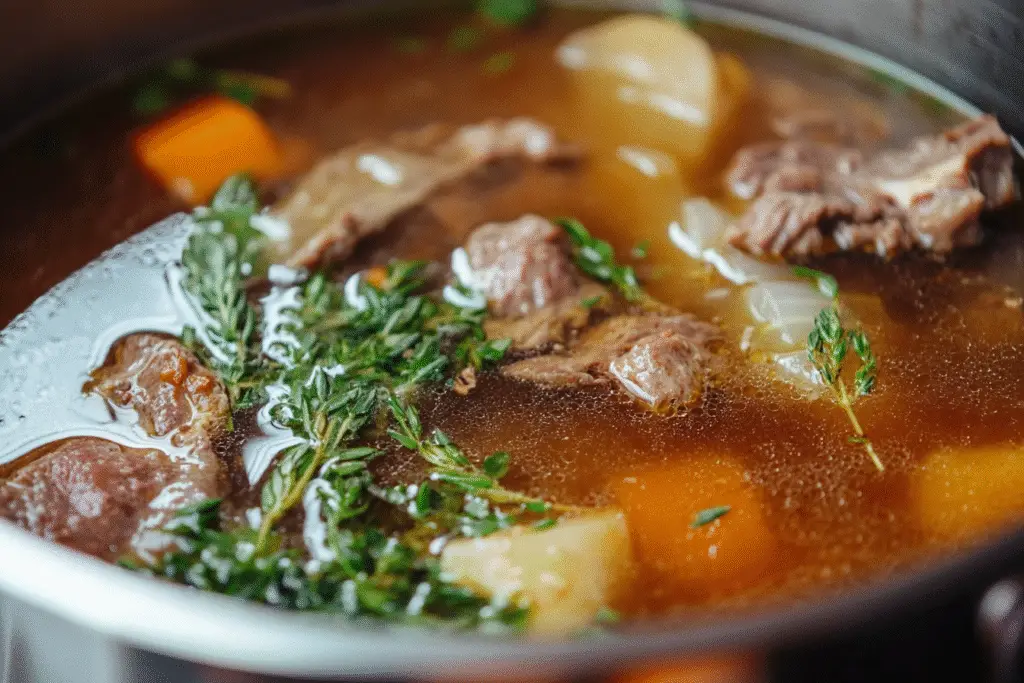
Step 3: Simmer the Broth
- Bring to a gentle boil, then immediately reduce to a low simmer.
- Skim off any foam that rises to the top in the first 30-45 minutes.
- Simmer uncovered or partially covered for 12–24 hours.
- If using a slow cooker, cook on low for at least 12 hours.
- If using a pressure cooker, cook on high pressure for 2-3 hours.
Step 4: Strain and Cool
- Remove large bones and solids with tongs.
- Strain broth through a fine mesh sieve or cheesecloth into a large bowl.
- Let cool slightly, then transfer to storage containers.
Step 5: Store and Use
- Chill broth in the refrigerator. Skim solidified fat from the top if desired.
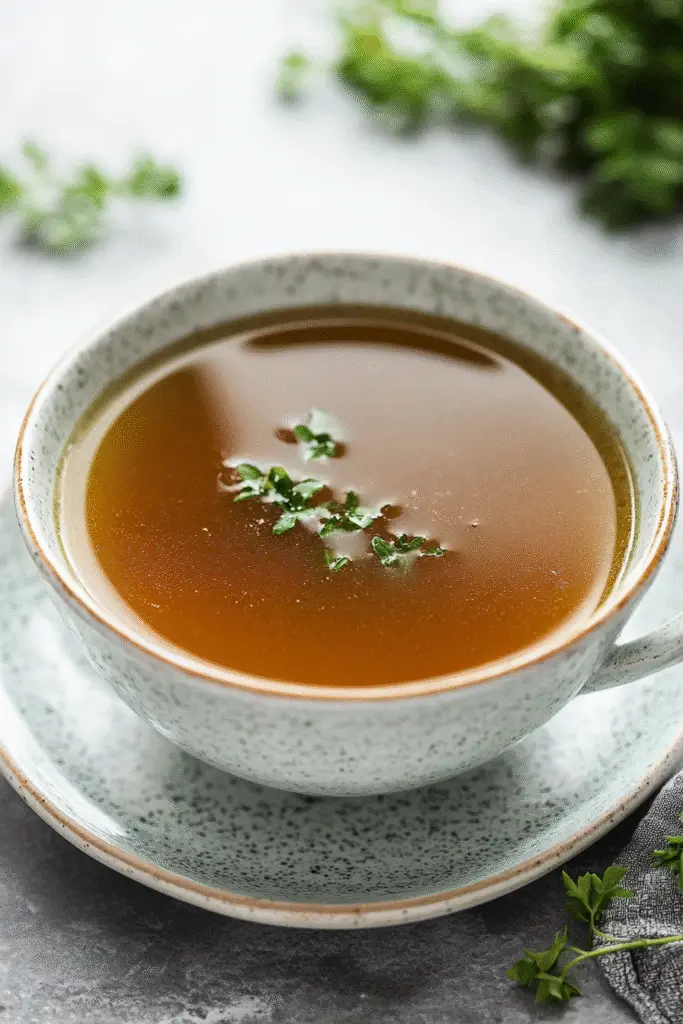
- Use broth as a sipping tonic, soup base, or in place of stock in recipes.
How to Check for Gelatin
Properly made bone broth should gel when chilled.
- If your broth doesn’t gel, it may need longer simmering or more collagen-rich bones.
- Non-gelled broth is still nutritious and flavorful—it just contains less gelatin.
Serving Suggestions
- Sipping Broth: Warm with a dash of salt, pepper, or soy sauce.
- Soup Base: Use for pho, ramen, beef noodle soup, or vegetable soups.
- Cooking Liquid: Use in place of water when cooking grains or legumes.
- Sauce and Gravy Base: Reduces beautifully for pan sauces.
Cooking Methods Comparison
| Feature | Stove-Top | Slow Cooker | Pressure Cooker |
|---|---|---|---|
| Cook Time | 12–24 hours | 12–24 hours | 2–3 hours |
| Flavor Depth | Deep | Deep | Slightly lighter |
| Hands-On Time | Moderate (skimming) | Minimal | Minimal |
| Best For | Traditional broth | Overnight cooking | Fast results |
FAQs and Troubleshooting
Can I reuse the bones?
Yes, but the second batch will be much lighter in flavor and nutrients. Some people do a second, shorter simmer to extract remaining gelatin.
Why is my broth cloudy?
It likely boiled too vigorously. Cloudy broth is still safe and flavorful, just less visually appealing.
Can I make this with just marrow bones?
You can, but it may lack the body provided by joint bones. A mix produces the best results.
Do I have to add vinegar?
Vinegar helps extract minerals but is not essential if you simmer long enough.
What if my broth doesn’t gel?
It’s still nutritious. Next time, add more knuckle bones or feet for higher collagen content.
Final Thoughts
Beef bone broth is a deeply nourishing, flavor-packed kitchen staple that’s worth the time and care it takes to prepare. It’s endlessly versatile, highly customizable, and offers both culinary and health benefits.
Whether you sip it straight, use it as the foundation for soups and sauces, or incorporate it into grains and braises, homemade beef bone broth adds an unmatched richness and depth to your cooking. Once you master the technique, you’ll likely find yourself making big batches regularly and wondering how you ever cooked without it.